Sensor Deployment
This document describes the deployment of both dockerized and “physical” sensors. We assume that the server was set up beforehand and is running properly. Deploying new sensors generally involves the following steps, which will be explained more thoroughly in the upcoming chapters:
- Upload firmware to the server, in case the intended firmware revision hasn’t been registered yet: This enables the server to distribute new firmware as update to already connected sensors.
- Using the web interface, configure a new sensor and obtain the automatically generated sensor configuration archive.
- Perform sensor installation on site (platform-specific).
Registering firmware
As preparation for deployment of new sensors, we first have to upload appropriate firmware to the server. This step is required so that already connected sensors can obtain firmware updates directly from the server, enabling remote over-the-air updates. In HoneySens terminology, “firmware” refers to a software package that contains all necessary components to run a sensor, usually targeting a specific platform. Currently, HoneySens supports two such platforms:
- Docker: Dockerized sensors are provided as Docker images which contain all required dependencies and software components to spawn new sensors on most hardware platforms.
- BeagleBone Black: Shortened as BBB, these low-cost development boards are our representation for “hardware” sensors which can be preconfigured and distributed to any site that wants to integrate “physical” sensors into their network. They have proven quite reliable and due to remote management capabilities via the HoneySens server can simply be forgotten after initial installation.
Regardless of the chosen platform, HoneySens sensor software is built to execute full remote system updates without the need to touch sensors manually. That capability is essential when managing a fleet of sensors distributed across different buildings or even company sites.
Firmware for the different platforms can be obtained as tarball from the Releases page. Each archive contains the actual firmware image, the format of which depends on its respective platform. In addition, each archive also contains some XML metadata (metadata.xml) and further platform-specific files such as a Compose file in the case of dockerized sensors.
Note: The following steps are only required once per firmware revision. If the intended firmware is already registered on the server, you don’t have to repeat these steps and can move straight on to sensor configuration.
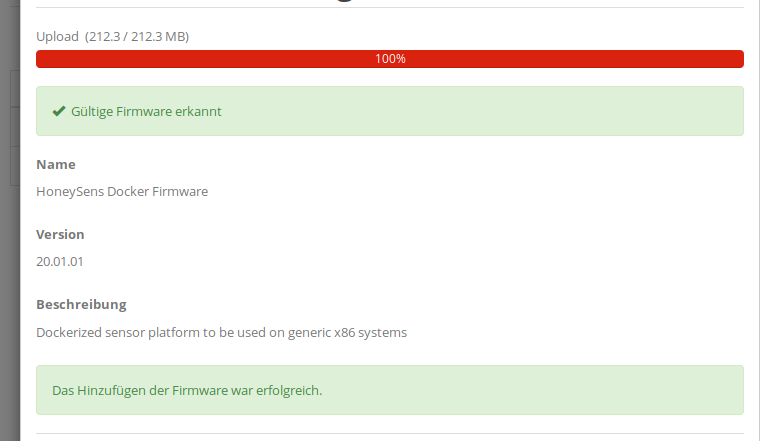
To upload new firmware to the server, log in to the HoneySens web interface and select Platforms in the sidebar on the left. This will list all currently supported platforms accompanied by the specific revisions already registered on the server (those can be shown with a click on the magnifying glass on the right side). A newly installed server will still list all platforms, but doesn’t come with firmware preinstalled. To initiate the upload of a new archive, click the Add button on the top right, select the firmware archive as downloaded from the Release page (it’s not necessary to unpack it) and follow the on-screen instructions. Successful firmware upload and verification results in the following screen:

Afterwards, the new firmware revision will appear as a new entry in the details for that specific platform (magnifying glass). In case you want to update already registered sensors to a new firmware revision, a button with an arrow icon in the revision list will let you chose another revision as global default. All connected sensors will then perform a firmware update upon their next polling cycle.
Sensor configuration
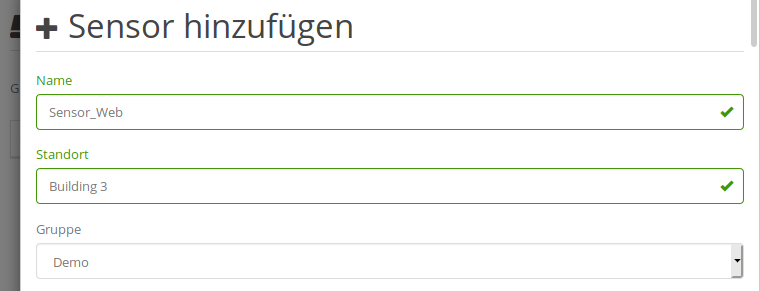
In preparation of deployment, each new sensor has first to be registered via the server’s web interface. For that, switch to the Sensors module in the sidebar and click the Add button. A dialogue appears which prompts to specify an initial configuration for the new sensor:

Start by specifying a unique name and brief location description, such as a building or room number. Don’t worry - both are just descriptive labels that can be changed at any time. As with most entities in the web interface, sensors are always associated with a specific User Group, which limits access to sensor data and configuration to a selected subset of users. If you’re the only user in the HoneySens deployment, just keep the default group that was created during server installation.
In the next section of the configuration dialogue, you can specify an alternative update interval (how often the sensor will poll the server, in minutes) as well as an alternative server endpoint (as IP) in case the planned network location of the new sensor doesn’t support connecting to the globally configured server DNS domain name. Caution: If the default server endpoint is overwritten, only an IP address can be specified as replacement. This is also a workaround in case you’re utilizing self-signed TLS certificates (see Preparation).
Advancing further, the firmware section allows you to overwrite the default firmware configuration with a custom revision. That feature can be useful to test new firmware revisions with just a few sensors prior to rolling them out globally, but can normally be left at “Standard”.
Next up is the sensor’s network configuration. That’s the most important thing to get right: When the sensor is deployed and starts up for the first time, it’ll rely on the parameters set here for its initial connection attempts to the server. Correct configuration depends on your specific network situation. Depending on the intended sensor platform, also consider the following peculiarities:
- Dockerized Sensor: A Sensor running inside of a container typically either uses the underlying host as gateway or directly accesses the host’s network stack (configurable on startup, see further below for details). In both cases, the sensor’s network interface will already be preconfigured and managed by the host system. That’s why the network interface should be set to Unconfigured, in which case the sensor software won’t touch its own network configuration.
- BeagleBone Black: In contrast to dockerized sensor, you always should set the network interface mode to either DHCP for automatic address assignment or Static to manually specify the required values.
In addition to the mandatory IP address configuration described above, there are further optional settings:
- EAPOL/IEEE802.1X Authentication: To authenticate the sensor via EAPOL, credentials can be directly supplied via the web interface.
- MAC Address: This allows you to overwrite the default MAC address of the sensor’s network interface.
- Internal network range for honeypot services: This setting specifies an internal network range that will be utilized by honeypot services running on that sensor. It’s important that this is set to a freely available range (not used anywhere else) within your local network. Please note that this IP range is only used internally within the sensor. It will never emit any packages from that range. By default, the service network range is globally set to
10.10.10.0/24. In case this overlaps with a neighbouring existing network, just specify any other unused network range. - HTTP(S) Proxy: In case a sensor should access its server via a proxy, activate that here. As for authentication schemes, the sensor will attempt to use NTLM, Digest and Basic authentication. If any of these succeeds, it will be used for subsequent connections.
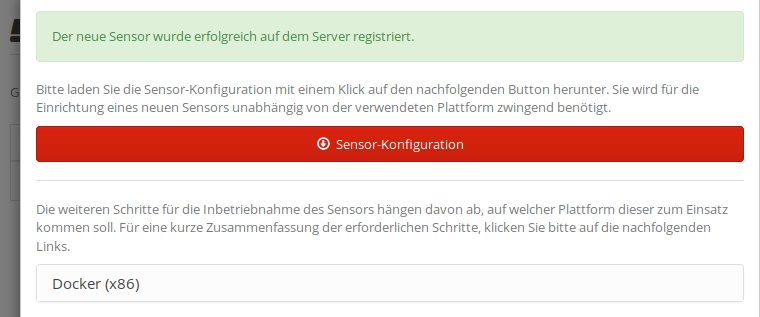
If you’ve adjusted the configuration to your needs, click Save. You will then see a summary dialogue that explains the next steps:

The most important button in here is the one labeled Download configuration: Upon clicking it, a so-called sensor configuration archive will be offered as download. It contains the sensor’s credentials and configuration and is required to bootstrap a new sensor, regardless of the intended sensor platform. Go ahead, download and save it for later. Below that button, there’s also an option to download firmware images for all registered platforms. Just remember that the basic requirements for sensor deployment are always:
- A firmware image for the intended target platform
- A configuration archive for a specific sensor
After you’ve obtained the configuration archive and a firmware image, click Close. The new sensor will then appear in the sensor overview with its status currently reported as Waiting for first contact.
Sensor installation
The last step remaining is to deploy the sensor on its intended system/location. This step is highly platform-dependent: Please follow the guidelines below that pertain to the chosen sensor platform.
Docker
Containerized sensors bundle all required components into a single x86 Docker container, including further nested containers for honeypot services. The main benefit of that platform is that just Docker is required on the software-side.
To deploy a new containerized sensor, first unpack the firmware bundle - obtained from either a HoneySens server or the Releases page - into a directory of your choice (on the target system). The resulting directory contents should look as follows:
$ ls -l
drwxr-xr-x 2 user user <size> <date> conf
-rw-r--r-- 1 user user <size> <date> docker-compose.yml
-rw------- 1 user user <size> <date> firmware.img
-rw-r--r-- 1 user user <size> <date> metadata.xml
-rw-r--r-- 1 user user <size> <date> Deployment.md
Deployment.md contains detailed installation instructions, metadata.xml is only relevant when uploading the archive to a HoneySens server. Both are not required for the installation process. However, firmware.img contains the sensor’s Docker image, docker-compose.yml is a template Compose project file that should be used to configure and manage the sensor locally and the conf/ directory is meant to house the sensor configuration archive as obtained from the server. Prior to continuing with the installation, you should first decide on a networking mode for the new sensor and adjust docker-compose.yml accordingly:
Networking modes: Two modes of operation are supported when connecting a sensor container to the outside world: Host and bridged networking. The networking setup is a combination of configuration parameters in the web frontend (which result in a configuration archive) and Docker-specific configuration options during deployment via the respective docker-compose.yml file.
-
Host networking: This mode is the default. Here we utilize the host networking support from Docker to share the container’s network stack with that of its host. In this mode, the sensor container applies the networking configuration set up in the frontend to the interface given via the
IFACEenvironment variable. That parameter should always be set to the “honeypot” interface that receives traffic from the outside. In case the interface management is done by other processes on the host, the sensor network should be set to unconfigured in the web frontend. Additionally, the sensor container will set up a new docker network for service containers (essentially a Linux bridge) and modify the host’s firewall (Netfilter) rules to ensure that all relevant traffic arrives at the proper destination containers. However, this mode might interfere with other processes on the host system that utilize the network stack as well. This can cause false-positive honeypot events (due to kernel connection tracking timeouts), but might also lead to more severe problems that could render local processes inoperable. In case of problems, it’s advisable to not run anything besides the sensor container on the same OS and fall back to bridged networking.To deploy a sensor in host networking mode, make sure that in
docker-compose.ymlnetwork_modeis set tohost- the environment variable
IFACEis set to the name of a local interface that external (honeypot) connections are expected on - there is no
networkssection defined
-
Bridged networking: In this mode the sensor container will spawn with its own network stack. This way, sensor operations are clearly separated from the host’s network. However, this comes with the drawback that you have to manually set up firewall rules that redirect traffic to the sensor container. An example for such a Netfilter rule that redirects all incoming traffic that doesn’t belong to any already active connection to the sensor could be
iptables -t nat -A PREROUTING -i <in_interface> -j DNAT --to-destination <sensor_container_ip>. Moreover, a sensor running in this mode can’t properly report its external interface address to the server, which will result in an internal address (such as172.17.0.2) to be shown as the IP address of the sensor in the web interface.To deploy a sensor in bridged networking mode, make sure that in
docker-compose.ymlnetwork_modeis set tobridge- the environment variable
IFACEis set toeth0
There are further operational settings that should be looked at within docker-compose.yml: The environment variable LOG_LVL specifies the granularity of logging output and can be set to either debug, info or warn. You may also set the restart policy by adjusting the restart setting. In the volumes section, make sure that the local host’s Docker socket is correctly mounted into the container. This is required for unattended container updates. The default /var/run/docker.sock should work for most distributions.
After docker-compose.yml has been adjusted, continue with the following steps:
- Load the Docker sensor image (in case it’s not already registered on the host):
docker load -i firmware.img - Copy the sensor configuration archive obtained from the server into the
conf/directory. That directory will be mounted into the sensor container on startup. Make sure that the directory doesn’t contain any other files or directories except the configuration archive. - Start the sensor:
HOST_PWD=$(pwd) docker compose up -d(omit-dto dump logging output to the terminal)
BeagleBone Black
The BeagleBone Black (BBB) is a small and inexpensive computing board that’s recommended in case sensors should be deployed on actual hardware and put somewhere physically. They ship with 4GB of internal eMMC storage, which has proven to be quite reliable. That’s why in practice these sensors are typically deployed in a sort of “fire and forget” fashion: Once installed and connected to the server, they can be managed through the web interface and typically need not to be touched again for a long time.
Deploying a BBB sensor requires preparation of a microSD card with the supplied firmware image and configuration archive. When booting a BBB from that medium, an automated installer will transparently copy the base system and configuration to the internal storage and boot the new sensor system. For preparation, an unused microSD card and a separate system with a suitable flash card reader is required. On that system, follow these steps:
- Unpack the firmware bundle - obtained from either a HoneySens server or the Releases page - into a directory of your choice. The resulting directory then contains two files: The installer image (
firmware.img) andmetadata.xml, the latter being irrelevant for the installation process. - Write the installer image
firmware.imgto a microSD card. On Linux or macOS, this can be accomplished withdd, e.g. withdd if=firmwage.img of=/dev/mmcblk0. On Windows, Win32 Disk Imager should work fine. For further details, have a look at this. - After writing, the microSD card will contain two partitions. Mount the first, smaller partition (it should have a size of roughly 100 MB) and copy a sensor configuration archive obtained from the server into its top-level directory. Then unmount the microSD card. Under Linux, that process could look like the following:
$ mount /dev/mmcblk0p1 /mnt $ cp s1.tar.gz /mnt/ $ umount /mnt - Insert the microSD card into the BeagleBone Black, then attach Ethernet and power cables to boot up the system. The LEDs on the board will indicate that the installation is in progress. After ten to twenty minutes, which mostly depends on the microSD card’s performance, the system will restart, boot the sensor firmware and try to connect to the server. Note: It’s fine to test connectivity first from a different network port (or room, building, …) than the one the sensor is intended to be deployed at later. Just keep in mind that the sensor’s network configuration (DHCP or static) will be the same in both locations.
Next steps
After successful sensor deployment, the sensor overview in the web interface should mark the new sensor as online (status column):

To make use of a newly installed sensor, have a look at the services documentation that explains how to schedule honeypot services on sensors.
